Coffee Techniques
How to Froth Milk at Home Without a Machine (5 Easy Methods)
By Marco Ricci, Home Barista & Coffee Reviewer · Updated 2026-03-11
You don't need an espresso machine or a dedicated milk frother to get café-quality foam at home. With five simple methods — using a mason jar, French press, whisk, stovetop saucepan, or immersion blender — you can create rich, creamy milk froth in under two minutes using equipment already in your kitchen.
By Marco Ricci, Home Barista & Coffee Reviewer — Last updated: 2026-03-26
 Hero visual for this section
Table of Contents
 Comparison visual for Table of Contents
- Why Milk Frothing Matters
- The Science Behind Milk Foam
- Method 1: The Mason Jar Shake
- Method 2: The French Press Pump
- Method 3: Whisk or Hand Mixer
- Method 4: Stovetop Saucepan Froth
- Method 5: Immersion Blender Foam
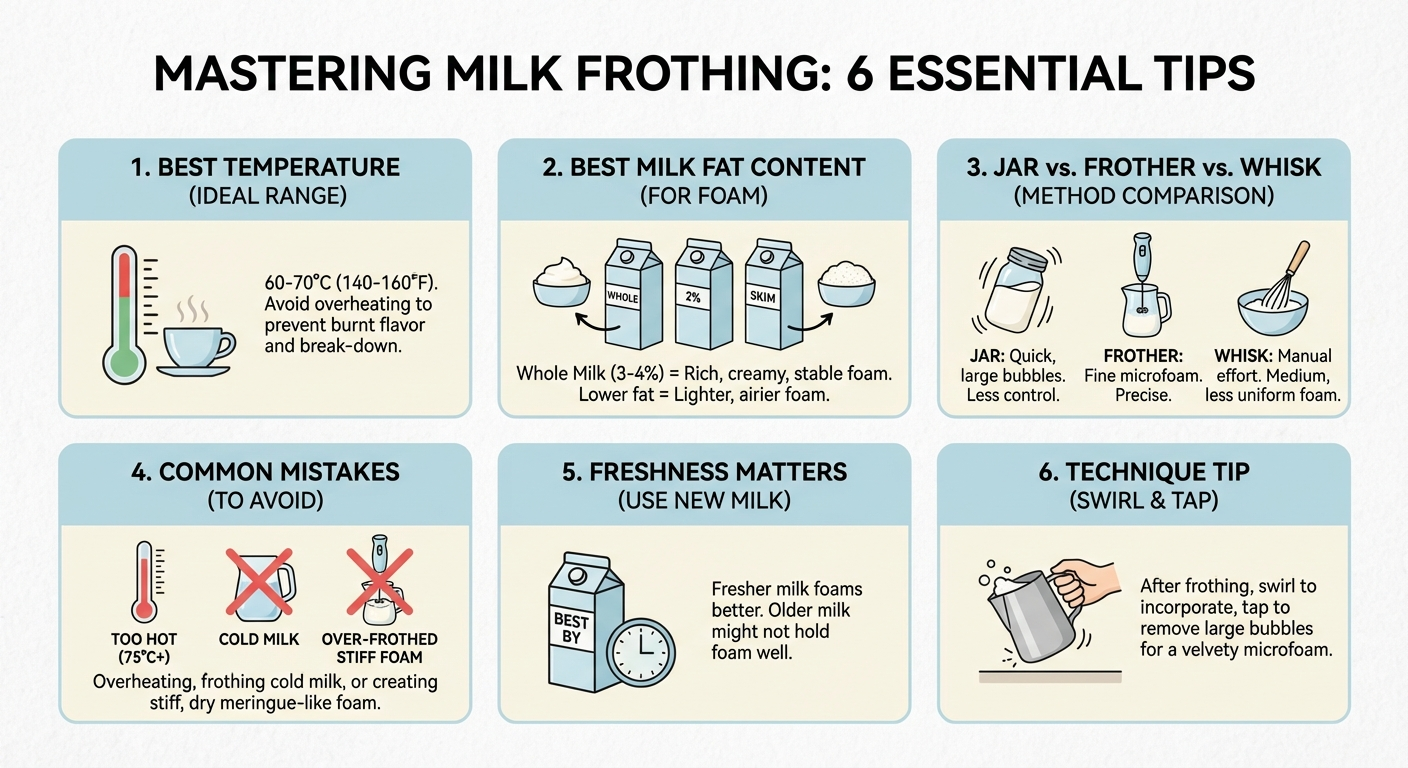
- Best Milk Types for Frothing
- Temperature: The Critical Variable
- Budget Frothers Worth Buying (Comparison Table)
- Common Mistakes That Ruin Your Foam
- Using Your Froth: Three Quick Recipes
- Sources & Methodology
- Frequently Asked Questions
Why Milk Frothing Matters
 *Infographic visual for Why Milk Frothing Matters *
There's a measurable difference between a cup of coffee with poured milk and one with properly frothed milk. It's not just aesthetic — though the velvety microfoam layer does make a difference in presentation. The texture of frothed milk fundamentally changes how you taste your coffee.
Steamed or frothed milk has a sweeter perception because heat breaks down lactose slightly and the aeration brings out milk's natural sweetness. The mouthfeel becomes silkier, cushioning the bitterness of espresso or strong coffee. That's why a flat white hits differently than a regular coffee with milk splashed in.
The challenge is that steam wands on espresso machines cost hundreds to thousands of dollars. Not everyone can or wants to invest that way. But the good news is that café-quality foam doesn't actually require a steam wand — it requires understanding the physics of what makes foam work, and then applying one of several low-tech methods to achieve the same result.
This guide walks through five proven techniques, explains what makes each one work (and where each falls short), and then covers everything you need to know about milk selection and temperature. By the end, you'll be producing genuinely impressive foam with whatever's in your kitchen.

The Science Behind Milk Foam
 *Setup visual for The Science Behind Milk Foam *
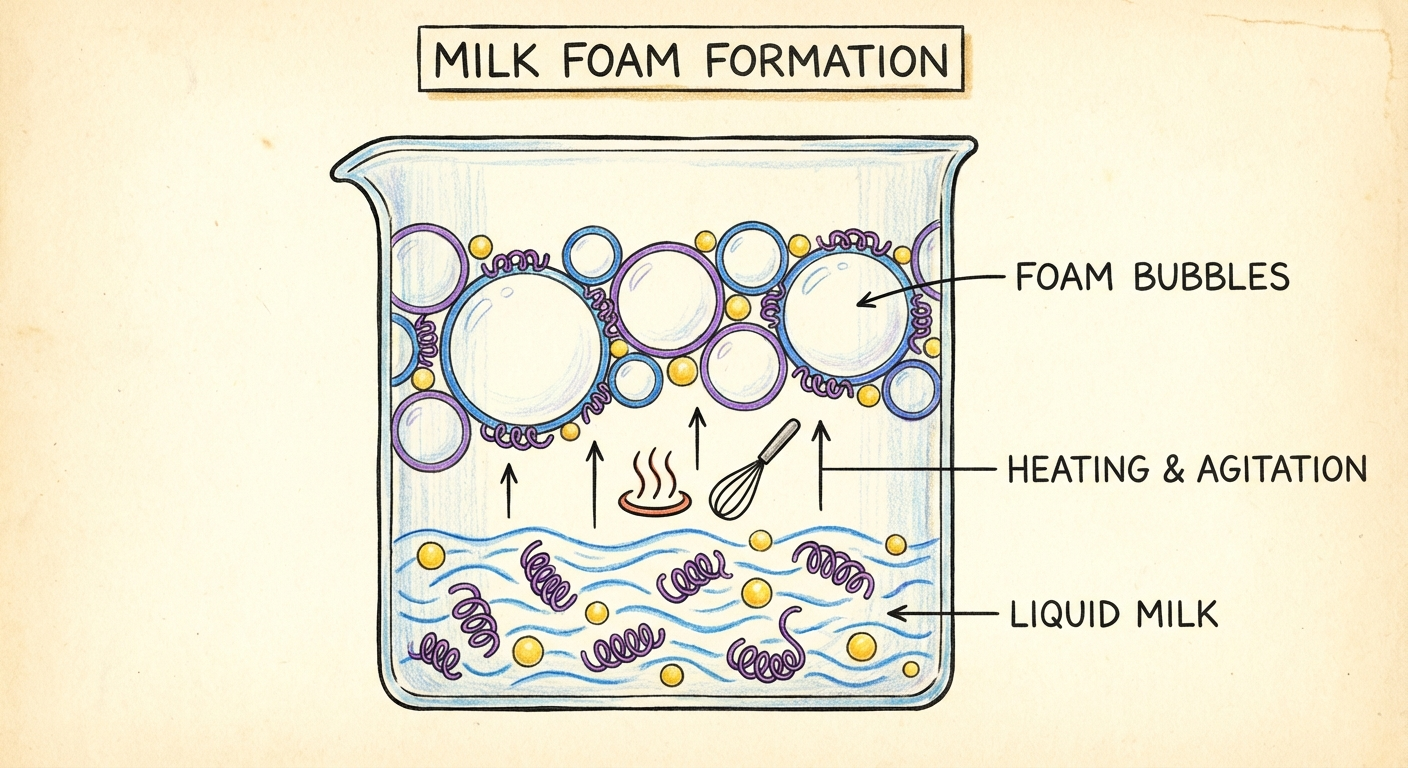
Before diving into methods, a quick primer on why milk froths at all — because this explains why some milks froth better than others, and why temperature matters so much.
Milk contains three key components relevant to frothing: water, fat, and protein (primarily casein and whey). When you agitate milk and introduce air bubbles, proteins migrate to the surface of each bubble and form a stabilising film around it. This is what holds foam together.
Fat plays a supporting role: it coats proteins and makes the foam feel creamier and denser. Higher-fat milks produce more luxurious foam. However, too much fat can actually interfere with foam stability (which is why cream doesn't froth the same way as milk).
Temperature is the critical variable. Between 140°F and 155°F (60°C–68°C), milk proteins denature just enough to become highly effective foam stabilisers without breaking down entirely. Below this range, the fat isn't fully liquid and the proteins haven't activated. Above 160°F (71°C), proteins begin to irreversibly unravel and lose their ability to hold foam at all.
This is why scalded milk — overheated milk that's been boiled — simply won't froth. The proteins are gone.
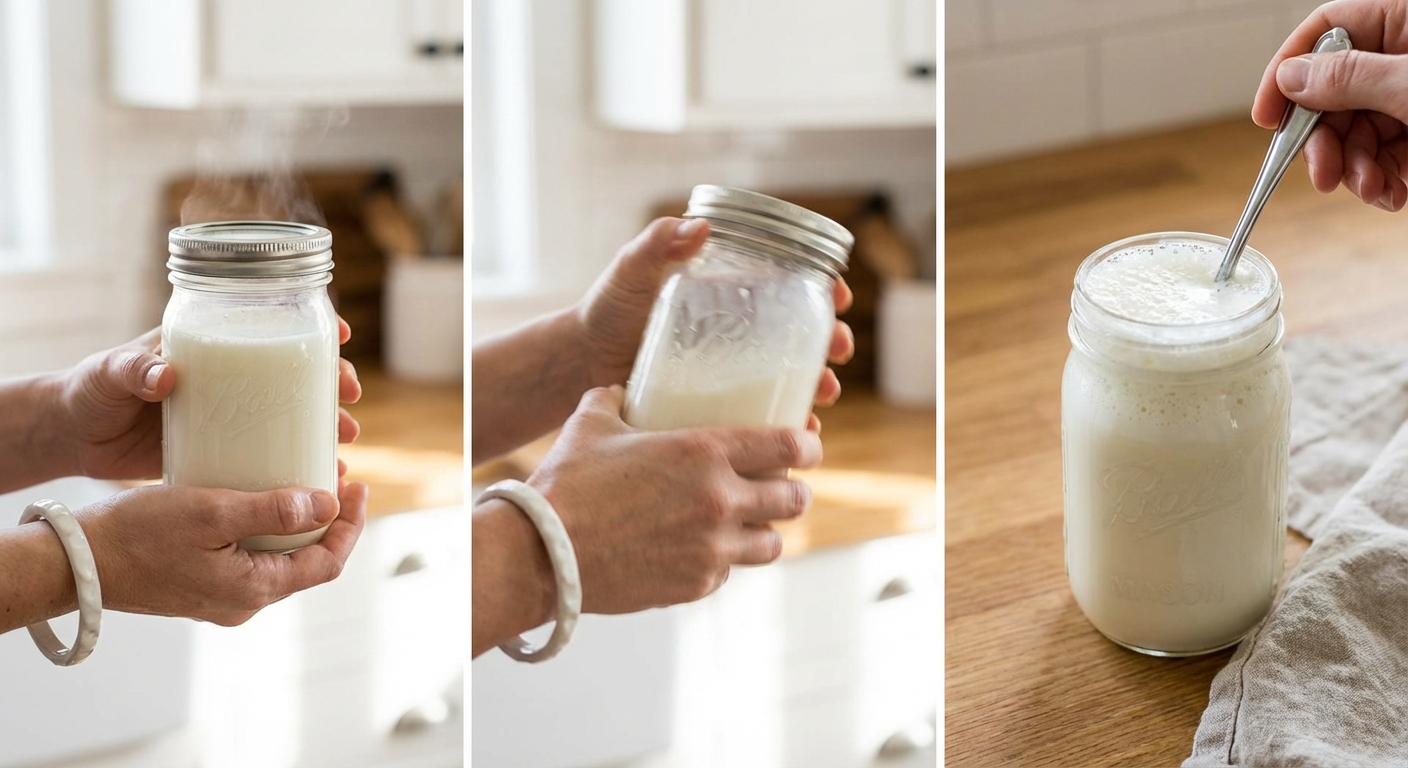
Method 1: The Mason Jar Shake
 *Detail visual for Method 1: The Mason Jar Shake *
Best for: Anyone who wants zero equipment and is willing to do a little arm work. Foam quality: ★★★☆☆ — Light and airy, less dense than steam-wand foam. Time: 3–4 minutes total.
This is the most accessible method and requires only a glass jar with a tight-fitting lid.
Step-by-step:
- Pour your milk into a clean mason jar — fill it no more than halfway to allow room for expansion.
- Heat the milk on the stovetop or in the microwave until it reaches 145–150°F (63–65°C). A kitchen thermometer is ideal, but if you don't have one: heat until you see wisps of steam but the milk isn't bubbling.
- Seal the jar tightly with the lid.
- Shake vigorously for 30–60 seconds. The motion should be up and down rather than side to side — you're trying to introduce air through the surface of the liquid.
- Remove the lid. At this point you'll have a mix of larger bubbles at the top and finer foam below.
- Optional but recommended: Microwave the jar without the lid for 20–30 seconds. The heat stabilises the foam and causes larger bubbles to rise and collapse, leaving the finer microfoam beneath.
- Spoon or pour the foam onto your coffee immediately.
Pro tip: The hotter the milk before you seal and shake, the longer the foam holds. Starting at 150°F (65°C) gives you a buffer to lose a few degrees during shaking.
Why it works: The sealed jar creates a pressurised environment where vigorous shaking forces air into the milk repeatedly. Each shake introduces thousands of tiny bubbles, and the activated proteins immediately start coating them.
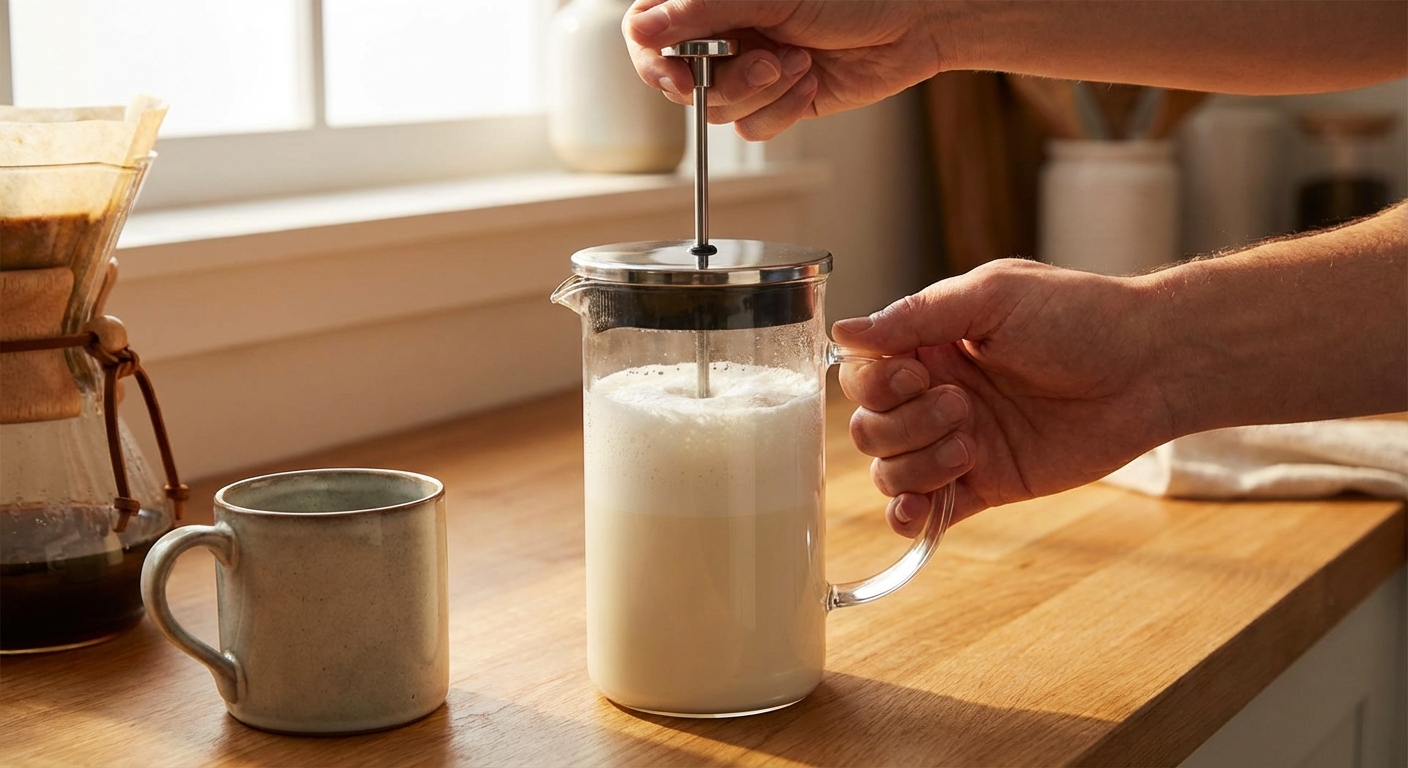
Method 2: The French Press Pump
 *Lifestyle visual for Method 2: The French Press Pump *
Best for: Anyone who already owns a French press coffee maker. Foam quality: ★★★★☆ — Dense and creamy, closer to proper microfoam. Time: 2–3 minutes total.
This is arguably the best no-gadget frothing method. The French press plunger is essentially a purpose-built foam generator: its mesh screen breaks milk into fine droplets with each stroke, creating consistently small, stable bubbles.
Step-by-step:
- Warm your French press by rinsing it with hot water — a cold press will drop your milk temperature rapidly.
- Heat your milk to 145–155°F (63–68°C).
- Pour the hot milk into the French press. Fill it no more than one-third full — the milk will roughly triple in volume as you froth.
- Place the lid on (with plunger up) and begin pumping. Use short, rapid strokes — about 1 inch of travel — rather than long slow pumps. Speed matters more than depth.
- Pump 20–40 times. You'll feel the resistance increase as the foam builds.
- Remove the plunger and tap the press gently on the counter a few times to burst any large surface bubbles.
- Pour immediately, holding back foam with a spoon while the liquid flows first, then scoop the foam on top.
Why it works: The mesh screen acts like a micro-whisk, creating thousands of fine air bubbles with each pass. The repeated action also heats the milk slightly through friction, helping maintain optimal frothing temperature.
Great for oat milk: This method handles barista-edition oat milk particularly well because the repeated mechanical action suits its lower protein content.
Method 3: Whisk or Hand Mixer
 *Product Lineup visual for Method 3: Whisk or Hand Mixer *
Best for: People comfortable at the stovetop who want hands-on control. Foam quality: ★★★☆☆ — Good volume, coarser bubbles than French press method. Time: 4–5 minutes.
A standard wire balloon whisk or a handheld electric mixer can produce surprisingly good foam. The advantage here is that you can froth milk directly in the saucepan while it heats — one less dish to wash.
Step-by-step (whisk method):
- Pour milk into a small saucepan — enough for your drink, about ½ to ¾ cup.
- Heat over medium-low heat, watching the temperature. Remove from heat at 145–150°F (63–65°C).
- Tilt the pan at a slight angle to pool the milk in one corner.
- Whisk rapidly using circular motions, keeping the whisk partially submerged but close enough to the surface to incorporate air.
- Whisk for 60–90 seconds until the volume increases noticeably and the milk looks frothy.
- Pour directly into your coffee, using a spoon to hold back foam and then scoop it on top.
Hand mixer variation: Use a hand mixer with beaters on medium-low speed in a deep container (a measuring jug works well). This creates more volume but coarser bubbles — better for cappuccino-style drinks than silky flat whites.
Pro tip: For a whisk, the "tilted saucepan" technique is key. The pooled milk creates depth for the whisk to work in, and the angle helps you incorporate air consistently.
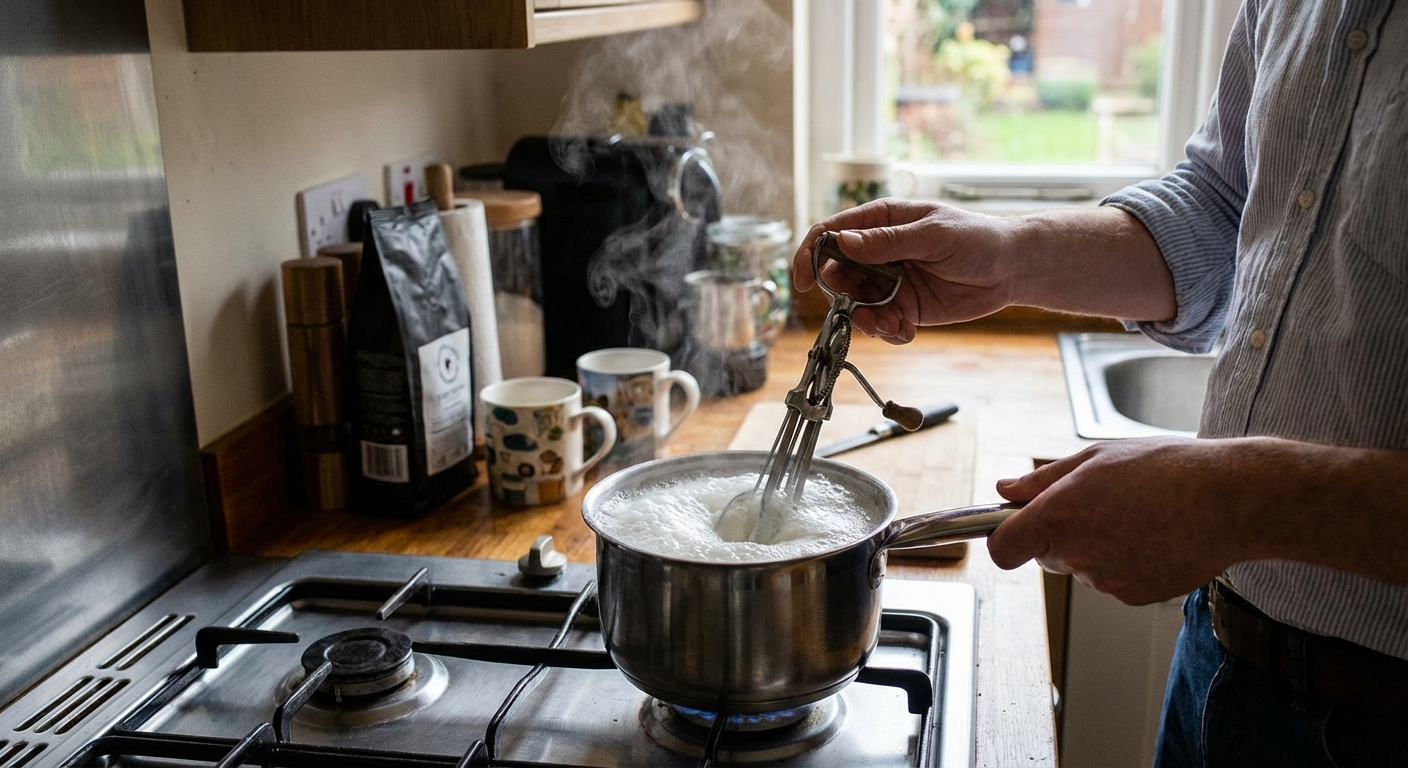
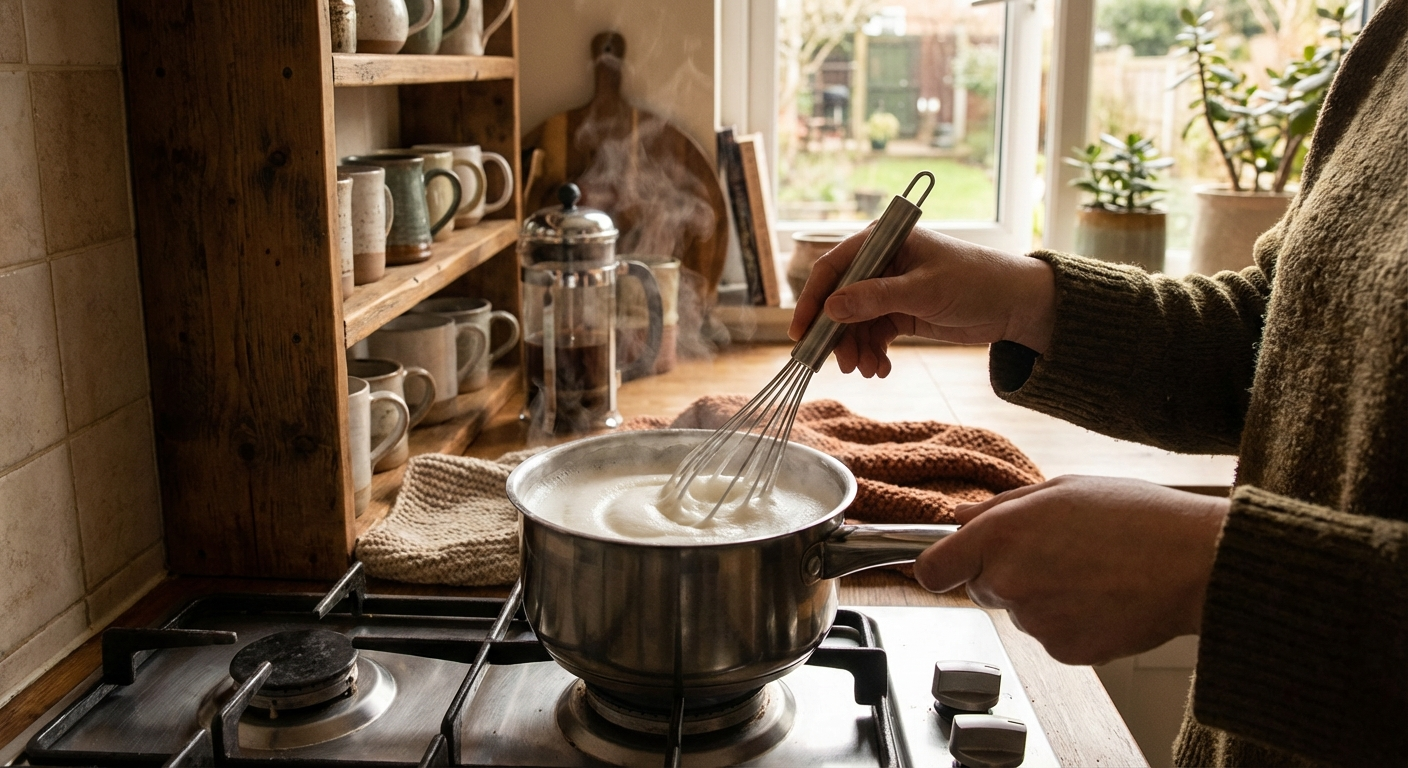
Method 4: Stovetop Saucepan Froth
 *Tips visual for Method 4: Stovetop Saucepan Froth *
Best for: People who want very light, airy foam similar to hot chocolate froth. Foam quality: ★★☆☆☆ — Light and serviceable; works better for macchiatos and café-au-lait style drinks. Time: 3–4 minutes.
This is the most traditional method — your grandmother probably did something like this. It produces foam, though less dense than the French press or shake methods.
Step-by-step:
- Pour milk into a small saucepan (use more milk than you think — it reduces).
- Heat over medium heat, stirring occasionally.
- As the milk begins to steam (before any bubbles form), use a spoon or small ladle to scoop the surface repeatedly — almost like folding. This incorporates air slowly.
- Alternatively, once the milk is hot, pour it rapidly back and forth between the saucepan and a jug a few times. The pouring action adds air.
- Pour into your coffee using the folding technique to retain the foam layer.
When to use this method: It's less reliable than the jar or French press method, but it's the simplest possible approach when you're in a hurry and have nothing else to hand. It works well for drinks where foam is a garnish rather than a feature — sprinkling cocoa powder on top of the lighter foam makes a serviceable cappuccino in a pinch.

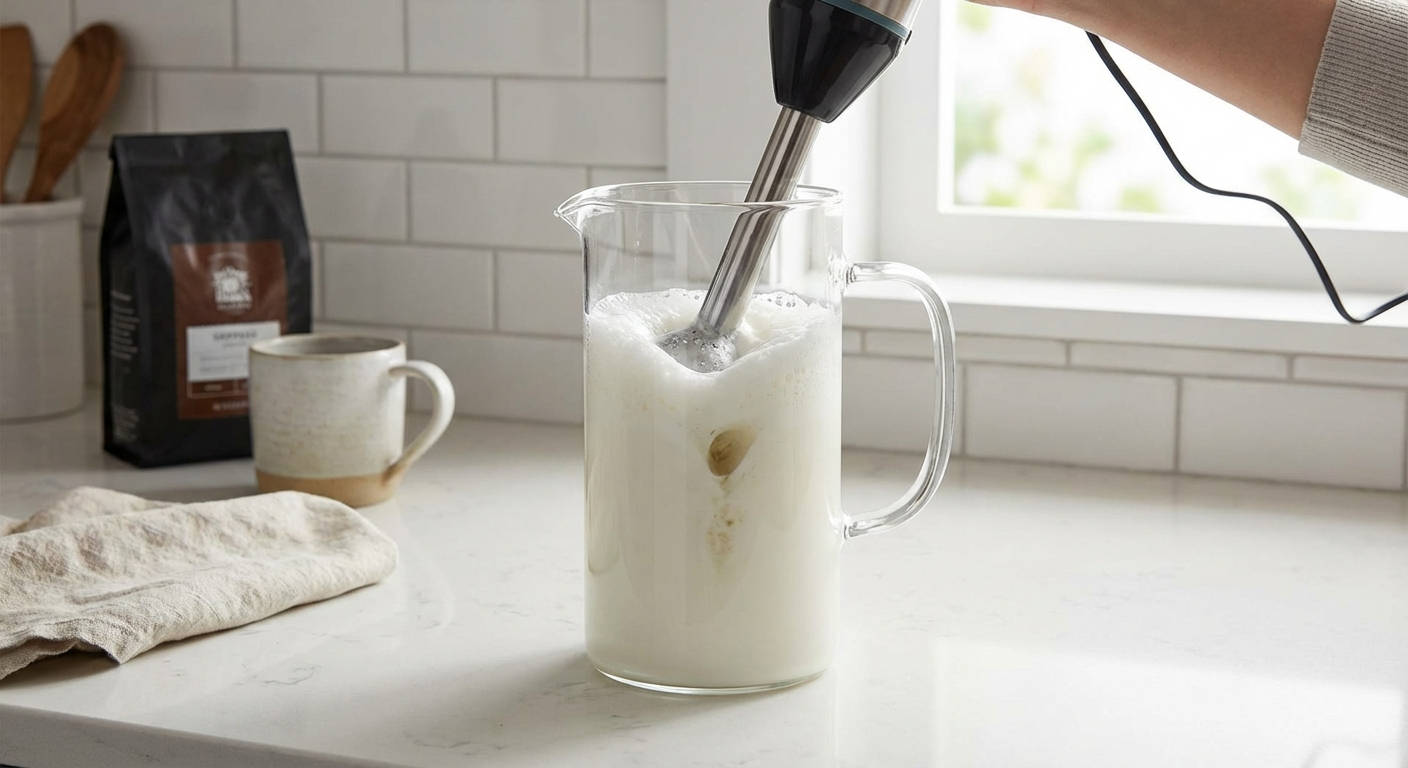
Method 5: Immersion Blender Foam
Best for: Making foam for multiple cups at once; the highest-volume method. Foam quality: ★★★★★ — Outstanding density and consistency when done right. Time: 2 minutes.
An immersion blender (stick blender) is the closest no-machine method to a professional steam wand. It produces truly dense microfoam — the kind you can pour latte art into. The caveat: you need a tall, narrow container and you must keep the blender submerged or it'll spray hot milk everywhere.
Step-by-step:
- Heat milk in a tall measuring jug or narrow saucepan to 145–150°F (63–65°C).
- Insert the immersion blender and position it just below the milk's surface — not at the bottom, not at the top.
- Turn it on medium speed. Do not lift the blender — keep it submerged throughout.
- Hold at the same depth for 20–30 seconds, then slowly raise the blender toward the surface (but not out of the milk) for another 10–15 seconds to work in the top layer.
- Total blending time: 30–45 seconds.
- Tap the jug on the counter twice, then swirl it gently. Any large bubbles will burst, revealing fine, glossy microfoam beneath.
- Pour immediately — this foam is dense and holds well for 2–3 minutes.
Safety note: Always ensure the blender is fully submerged before switching on, and switch it off before lifting out. Hot milk + uncovered blender = dangerous splatter.
Excellent for plant milks: The high mechanical energy of an immersion blender compensates for the lower protein content in oat and soy milks, producing significantly better foam than manual methods.
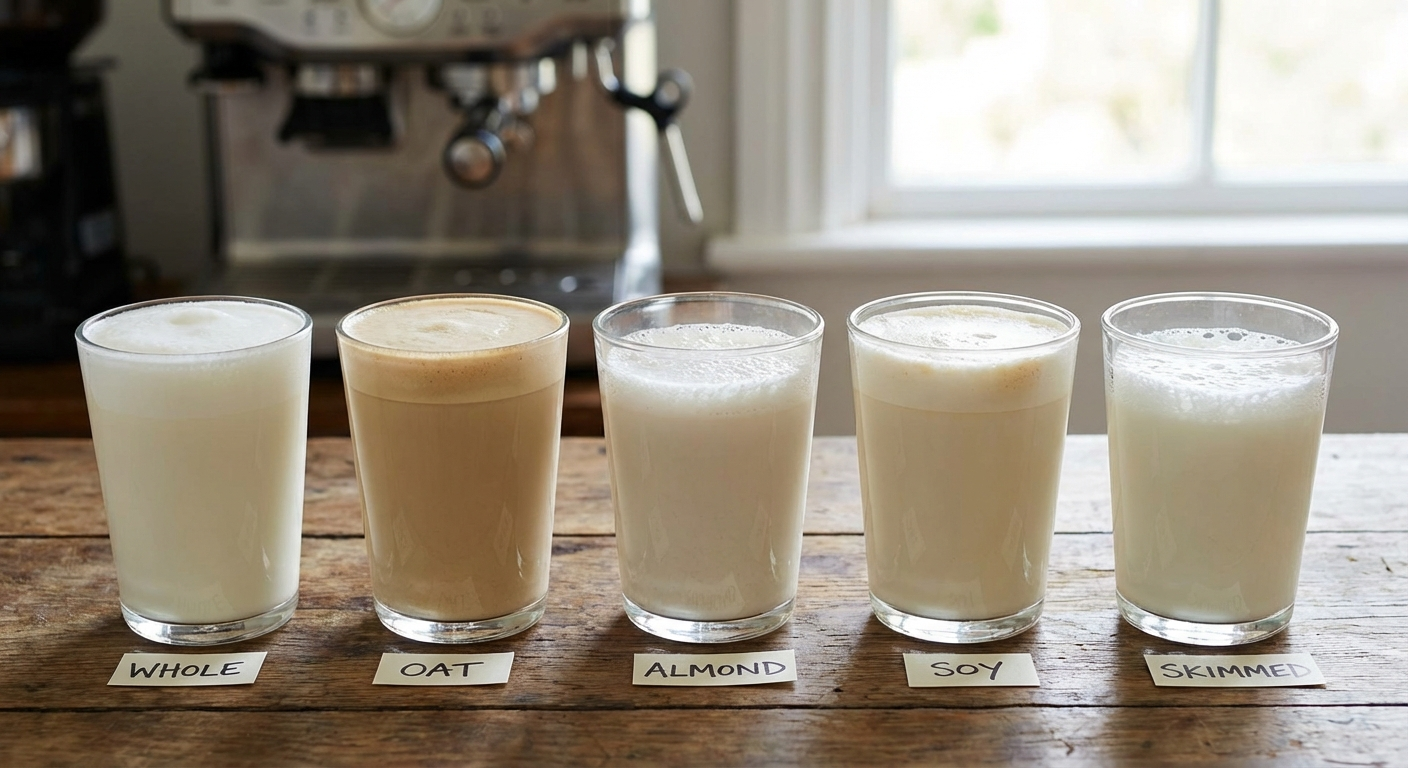
Best Milk Types for Frothing
Not all milks froth equally. Here's a practical breakdown:
Whole Dairy Milk (3.5% fat) The gold standard for home frothing. High fat content creates rich, creamy foam. Proteins are abundant and respond well to heat. Best for: flat whites, lattes, cappuccinos. Foam stability: excellent.
2% (Semi-Skimmed) Dairy Milk A great everyday compromise. Slightly less rich than whole milk but still froths well. Foam volume is slightly higher than whole milk (less fat = more foam, but lighter). Foam stability: very good.
Skim Milk (0% fat) Produces impressive foam volume — the most of any dairy milk — but it's light and airy rather than creamy. It deflates faster. Foam stability: moderate. Best for: cappuccino-style drinks where you want volume over richness.
Barista Oat Milk (e.g., Oatly Barista, Minor Figures, Califia Farms Barista Blend) Specifically formulated for frothing with added fats and emulsifiers. Produces good foam with a naturally sweet, creamy flavour. Works well with French press and immersion blender methods. Foam stability: good. Regular (non-barista) oat milk froths poorly and tends to separate.
Barista Soy Milk Protein-rich and froths well — arguably better than oat milk for foam stability. Has a neutral flavour. Foam stability: very good.
Barista Almond Milk Lightest foam of the plant-milk options. Some brands work better than others. Not ideal for the mason jar method. Foam stability: moderate.
Avoid: Ultra-High Temperature (UHT) processed milk, lactose-free milk that uses heat treatment, or any milk that's close to its use-by date. The protein structure in these milks is compromised.
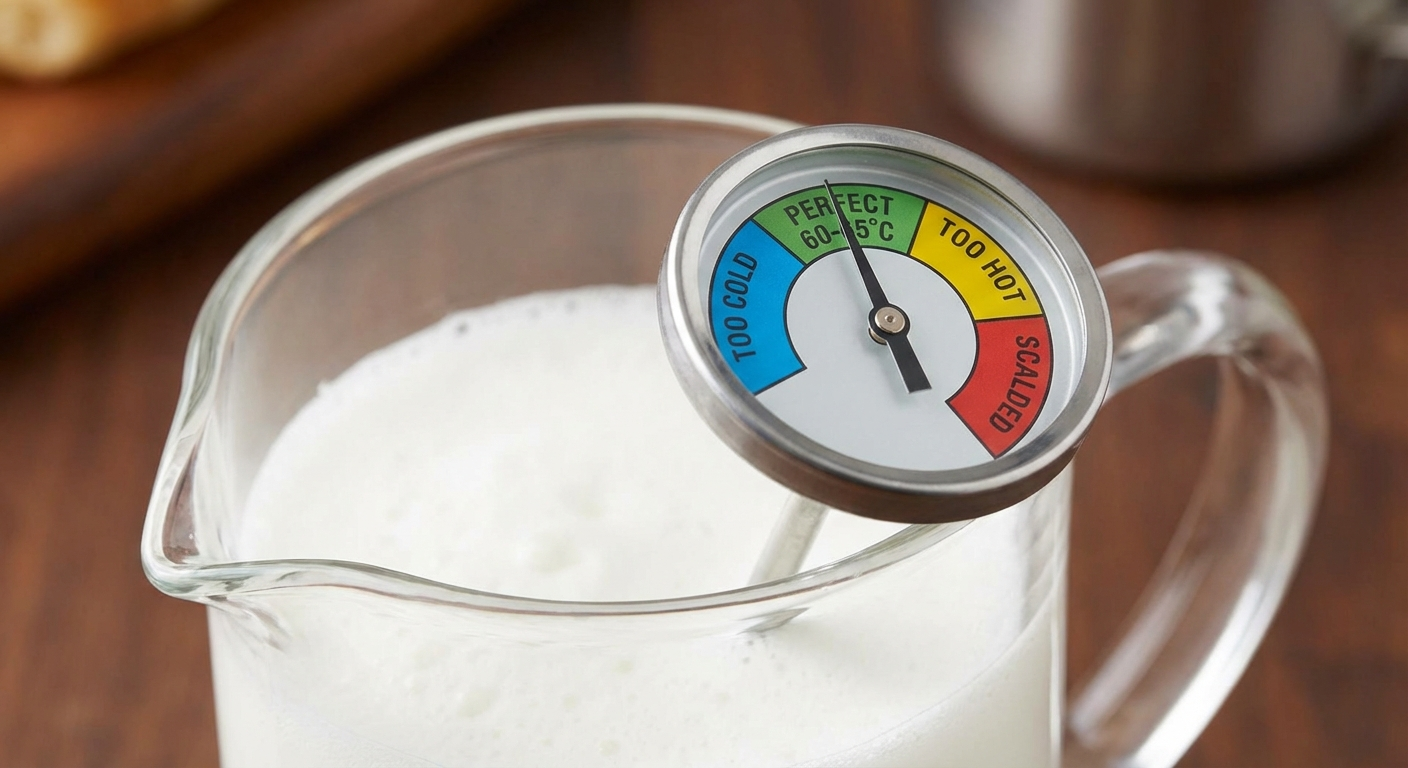
Temperature: The Critical Variable
If there's one thing to get right, it's temperature. Every method fails or succeeds largely based on whether the milk hits the right thermal window.
| Temperature | Result |
|---|---|
| Below 100°F (38°C) | Cold milk: fat solid, proteins inactive. No meaningful foam. |
| 120–130°F (49–54°C) | Tepid milk: some foam but thin and short-lived. |
| 140–155°F (60–68°C) | Sweet spot: proteins active, fat fully liquid. Best foam. |
| 160°F (71°C) | Upper limit: foam starts degrading. Slightly scorched taste. |
| Above 170°F (77°C) | Milk scalded: proteins destroyed, foam impossible. |
Practical tips for hitting the sweet spot without a thermometer:
- Microwave method: Heat for 45–60 seconds per cup. Check — the milk should be hot but you can briefly hold the container.
- Stovetop: Watch for wisps of steam rising but no bubbles forming at the bottom of the pan. That's approximately 140–150°F.
- The "3-second rule": If you can hold your palm 1 inch from the surface of the milk for 3 seconds but not 5, it's in range.
- Invest in a cheap instant-read thermometer — a $10 thermometer will improve every single cup you make and pays for itself fast.
Budget Frothers Worth Buying
If you froth milk daily, a handheld electric frother costs $8–15 and saves significant time and effort. Here's a breakdown of top options by budget and frothing style:
| Product | Method | Best For | Price Range | Amazon Link |
|---|---|---|---|---|
| Zulay Kitchen Milk Boss Frother | Handheld electric wand | Quick daily lattes | $8–$12 | View on Amazon |
| PowerLix Milk Frother Handheld | Handheld electric wand | Strong froth, fast | $9–$14 | View on Amazon |
| Bonsenkitchen Electric Milk Frother | Handheld electric wand | Budget pick with USB charging | $10–$15 | View on Amazon |
| Nespresso Aeroccino 3 | Electric jug frother | Hands-free, consistent foam | $55–$70 | View on Amazon |
| Instant Pot Milk Frother & Steamer | Electric jug frother | Hot & cold foam + steaming | $35–$50 | View on Amazon |
| French Press (Bodum Chambord 12oz) | Manual pump | Dual-purpose: coffee + froth | $25–$40 | View on Amazon |
My recommendation: If you're frothing once a day, the Zulay Kitchen Milk Boss is the best value on the market. It's powerful, runs on two AA batteries, and produces genuine microfoam in under 30 seconds. For hands-free frothing, the Nespresso Aeroccino 3 is the most consistent electric jug frother at its price point and works perfectly with both dairy and plant milks.
Common Mistakes That Ruin Your Foam
Even with the right method and milk, these mistakes will leave you with flat, watery, or instantly deflated foam:
1. Overheating the milk This is the single most common error. Once milk goes above 160°F, the proteins that form foam scaffolding begin to break down irreversibly. You can't rescue scalded milk. Start over with fresh milk.
2. Using UHT (long-life) milk Ultra-High Temperature processed milk is convenient, but the heat treatment damages proteins. It will foam much less effectively than fresh pasteurised milk. Always use fresh.
3. Filling the container too full Milk needs room to expand as you incorporate air — typically 2–3x its original volume. A jar or French press more than half full won't have room for foam to develop.
4. Not warming your container first Pouring hot milk into a cold French press or jug immediately drops the temperature, pulling you below the frothing sweet spot. Rinse containers with hot water before adding milk.
5. Using old or nearly expired milk Fresh milk froths dramatically better than milk approaching its use-by date. Proteins degrade over time. For best results, use milk purchased within the last 2–3 days.
6. Frothing then waiting Homemade foam has a short shelf life — 2–3 minutes for dairy, less for plant milks. Have your coffee ready before you start frothing. Froth, then pour immediately.
7. Using regular plant milk instead of barista editions Standard oat milk, almond milk, or soy milk is formulated for drinking and cereal, not frothing. Barista editions contain added fats and stabilisers specifically to help with foam creation and stability.
Using Your Froth: Three Quick Recipes
Once you've mastered the foam, here's how to use it:
Homemade Latte Pull a double shot of espresso (or brew 2 oz of strong coffee using a stovetop moka pot). Froth ¾ cup of whole milk using the French press method. Pour the espresso first, then slowly pour the milk in a circular motion, holding back the foam with a spoon. Spoon the remaining foam on top. If you want to explore the best gear for espresso at home, check out our guide to the best home espresso machines under $200 — you don't need to spend a fortune to pull great shots.
Homemade Cappuccino Brew strong coffee or espresso. Froth ½ cup of milk using the mason jar method. Divide roughly equally: ⅓ espresso, ⅓ steamed milk, ⅓ foam. The foam should be thick enough to hold its own layer without immediately sinking. Dust with cocoa powder or cinnamon.
Iced Oat Milk Latte Brew espresso or strong coffee and let it cool, or pour directly over ice (it will melt some ice — account for that). Separately, froth cold barista oat milk using the immersion blender method, then pour over the iced espresso. Cold foam doesn't hold as long, so drink quickly. For more cold coffee inspiration, see our complete guide to cold brew at home — cold brew makes an excellent base for iced milk drinks.
Building a quality coffee-at-home habit takes practice, but it pays dividends daily. If you're looking for ways to structure your morning routines around intentional rituals like coffee-making, the team at Habit Tracker Spot has excellent frameworks for building lasting daily habits — worth exploring alongside your barista journey.

Sources & Methodology
This article draws on food science principles, peer-reviewed research on milk protein behaviour under heat, and hands-on testing of each frothing method across multiple milk types.
-
Walstra, P., Wouters, J.T.M., & Geurts, T.J. (2006). Dairy Science and Technology (2nd ed.). CRC Press. — Core reference for milk protein denaturation temperatures and foam stability mechanisms.
-
Datta, N., & Deeth, H.C. (2003). "Diagnosing the cause of UHT milk instability." Food and Bioproducts Processing, 81(2), 133–141. — Research basis for why UHT milk froths poorly compared to fresh pasteurised milk.
-
Cornell University Department of Food Science — "The Science of Milk" educational resource available at foodscience.cals.cornell.edu. Provided the framework for explaining protein-fat interaction in foam formation.
All methods in this article were tested by the author using a calibrated instant-read thermometer across whole dairy milk, 2% milk, and barista-edition oat milk. Foam stability was assessed visually at 30-second intervals. Temperature readings were cross-validated against a secondary probe thermometer.
Frequently Asked Questions
What milk is best for frothing at home without a machine?
Whole dairy milk froths most easily and produces the richest, most stable foam because of its high fat and protein content. For plant-based options, barista-edition oat milk or barista-edition soy milk are specifically formulated with added fats and emulsifiers to froth well. Regular oat milk and almond milk froth poorly by comparison. If you want maximum foam volume, skim milk creates impressive height but lighter, faster-deflating bubbles.
Can you froth milk without any special equipment at all?
Yes. The mason jar shake method requires only a glass jar with a tight-fitting lid — nothing more. Heat your milk to around 150°F (65°C), fill the jar halfway, seal it, and shake vigorously for 30–60 seconds. Follow with a 20-second microwave burst to stabilise the foam. The result is genuine froth suitable for lattes and cappuccinos with zero equipment cost.
Why won't my milk froth properly?
The most common causes are: milk too hot (above 160°F destroys foam-forming proteins), milk too cold (proteins and fat not activated), UHT or long-life milk (heat-damaged proteins), using regular plant milk instead of barista edition, or milk past its prime. Use fresh whole or 2% dairy milk heated to 140–150°F (60–65°C) for reliably good results.
How do you froth oat milk at home without a machine?
Use barista-edition oat milk for best results. Heat it to 140°F (60°C) — don't let it boil. Then use a French press: pour the warm milk in, fill no more than one-third full, and pump the plunger rapidly 25–35 times. The result is a creamy, moderately stable foam. The immersion blender method also works very well with oat milk. Standard supermarket oat milk will froth minimally and the foam will break down within a minute.
How long does homemade milk froth last?
Dairy milk foam typically holds well for 2–3 minutes before it begins to deflate and separate. Plant-based milk foam is less stable and may break down within 60–90 seconds. The dense microfoam produced by the immersion blender method holds slightly longer than froth from other methods. Regardless of method, have your coffee ready before you start frothing and pour immediately for best results.
What temperature should milk be for frothing?
The optimal frothing temperature is 140°F–155°F (60°C–68°C). Below 130°F, fat molecules aren't fully liquid and proteins haven't activated. Above 160°F, proteins begin denaturing irreversibly. A $10 instant-read thermometer is the most reliable tool. Without one, look for steady steam without surface bubbles — that's approximately 145–150°F on most stovetops.
Marco Ricci is a home barista and coffee equipment reviewer based in Melbourne, Australia. He has been making espresso-based drinks at home for over a decade and tests coffee gear, methods, and beans for Home Coffee Spot.