Espresso
How to Dial In Espresso: Step-by-Step Guide (2026)
By Rachel M., Home Barista & Coffee Educator · Updated 2026-03-20
Dialing in espresso is the process of adjusting grind size, dose, yield, and extraction time to pull a balanced, flavourful shot. This beginner's guide walks you through every variable step by step—so you can stop guessing and start pulling espresso that actually tastes great, consistently, at home.
By Rachel M., Home Barista & Coffee Educator | Last updated: March 2026
| Option | Best For | Price Range | Rating |
|---|---|---|---|
| Precision Coffee Scale (0.1g) | Weighing dose and yield accurately | $20–$50 | ⭐⭐⭐⭐⭐ |
| Burr Coffee Grinder | Consistent, adjustable espresso grind | $150–$500 | ⭐⭐⭐⭐⭐ |
| WDT Distribution Tool | Breaking up clumps for even extraction | $10–$30 | ⭐⭐⭐⭐½ |
| Calibrated Tamper (58mm) | Consistent tamping pressure every time | $30–$80 | ⭐⭐⭐⭐½ |
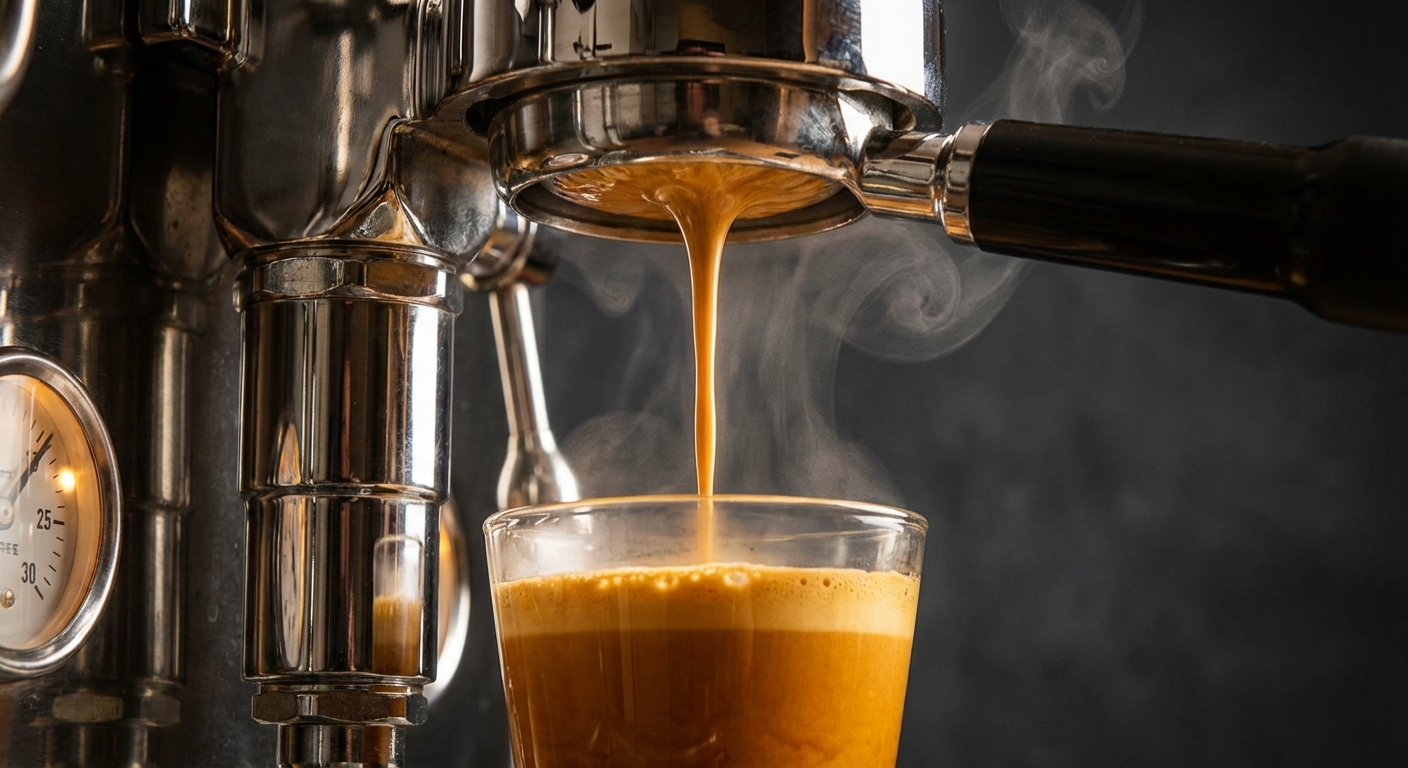
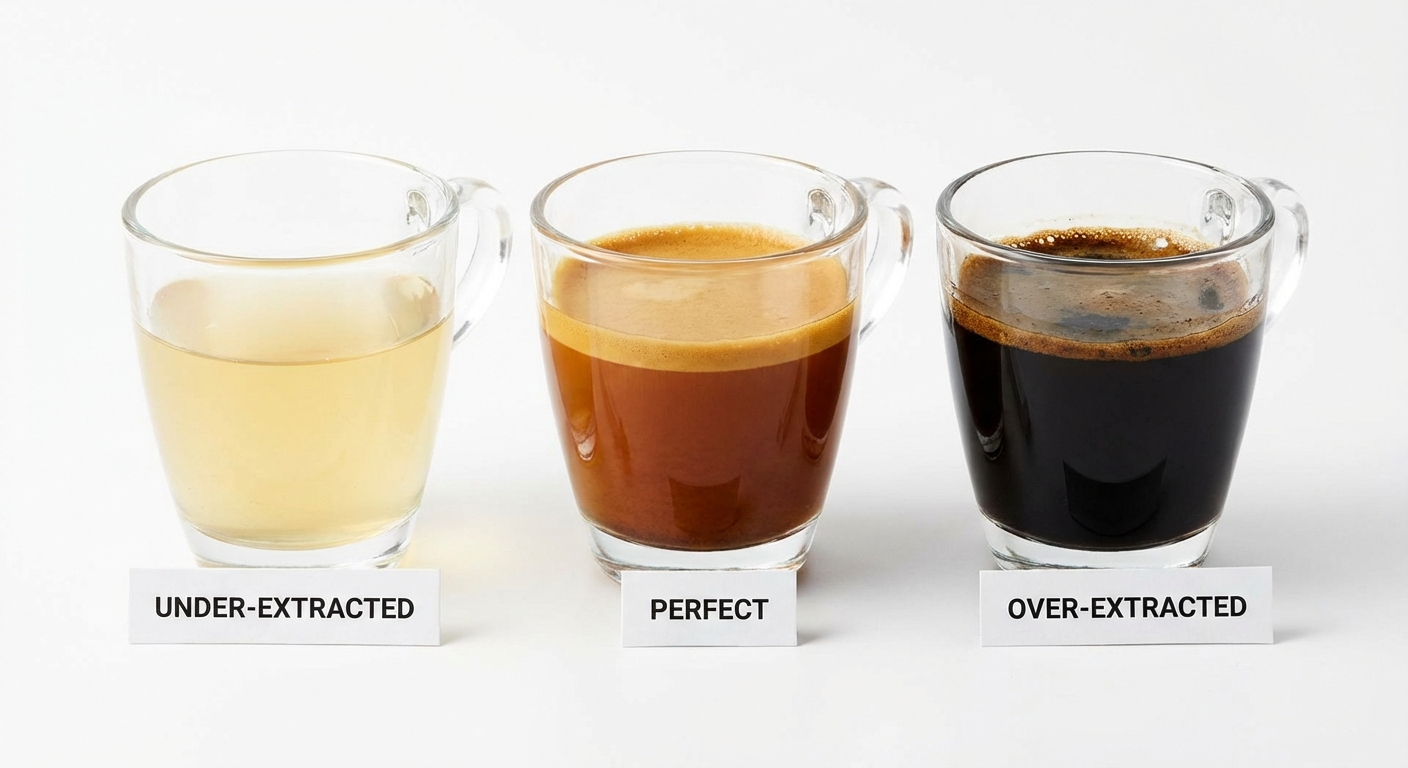
Visual guide: Dialing in espresso from first shot to perfectly balanced extraction
Table of Contents
- What Does "Dialing In" Actually Mean?
- What You Need Before You Start
- Essential Equipment for Dialing In
- The Four Variables That Control Your Shot
- Step-by-Step: How to Dial In Espresso
- How to Read Your Shot: Taste Troubleshooting
- Puck Preparation: The Secret to Consistency
- Common Dialing-In Mistakes Beginners Make
- When to Re-Dial Your Espresso
- Dialing In for Milk Drinks vs. Straight Espresso
- Frequently Asked Questions
- Sources & Methodology
What Does "Dialing In" Actually Mean?
Every bag of coffee is different. Different origin, different roast date, different density, different moisture content. Your espresso machine doesn't know any of that—it just pushes hot water through ground coffee at pressure. Your job is to tell it how to do that well by controlling the variables you can adjust.
Dialing in is the systematic process of pulling test shots and adjusting one variable at a time until the espresso in your cup is balanced—not sour, not bitter, but sweet, complex, and enjoyable.
Think of it like tuning a guitar. Each string (variable) affects the whole sound (flavour). You don't randomly twist all the pegs at once. You tune one string, listen, then move to the next.
The good news: once you understand the system, dialing in takes 3-5 minutes and 2-4 shots. It's not magic. It's a repeatable method, and this guide gives you the exact steps.
What You Need Before You Start
Before you touch your grinder, make sure you have these basics sorted:
Fresh beans: Use coffee that's 7-21 days past its roast date. Too fresh and CO₂ causes unpredictable extraction. Too old and the flavours have faded. Check the roast date on the bag—if there isn't one, find a different roaster.
Clean equipment: Backflush your machine if it has a three-way solenoid valve. Purge old grounds from your grinder by running 2-3 grams through it. Old coffee oils and stale grounds will taint your results before you even start.
A notebook or phone: Write down every shot. Dose, grind setting, yield, time, and taste notes. This sounds tedious, but it's the difference between systematically improving and randomly guessing for weeks.
Time and patience: Plan to use 4-6 shots' worth of coffee. Accept that the first few shots will be bad. That's the process working, not a failure.
Essential Equipment for Dialing In
You don't need thousands of dollars of gear, but a few affordable tools make the difference between frustrating guesswork and a reliable process.
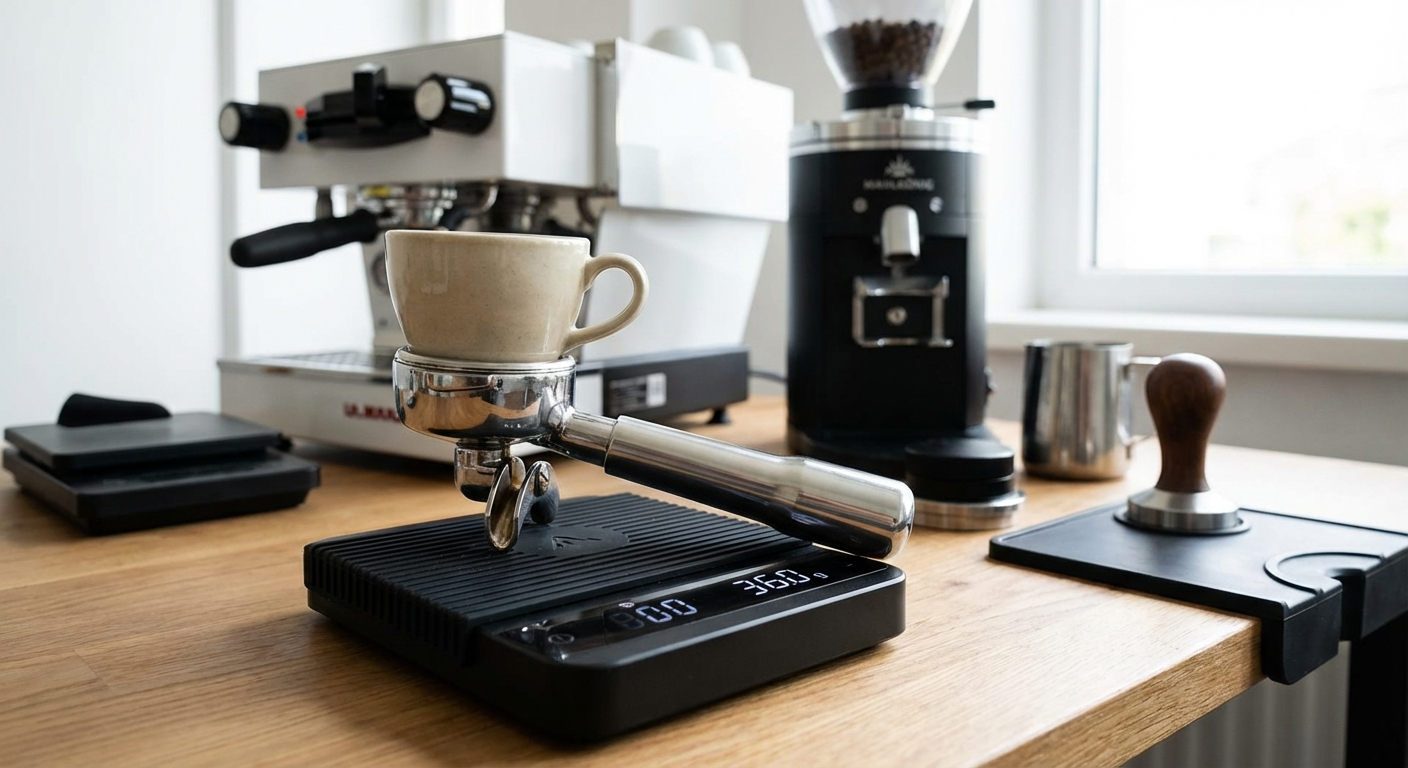
Precision Coffee Scale (0.1g)
Why it's essential: You cannot dial in espresso without weighing your dose and yield. Volumetric measurements are unreliable—crema makes visual assessment nearly impossible. A 0.1g-accurate scale lets you replicate results.
What to look for: 0.1g accuracy, built-in timer, fast response time, and a platform that fits under your group head.
Burr Coffee Grinder
Why it's essential: A quality burr grinder with stepless or fine-stepped adjustment is the single most important piece of espresso equipment. Blade grinders and coarse-stepped grinders cannot make the micro-adjustments dialing in requires.
What to look for: Stepless grind adjustment, low retention, consistent particle size distribution. Budget picks start around $150; mid-range grinders around $300-500 deliver excellent results.
WDT Tool (Weiss Distribution Technique)
Why it matters: A WDT tool—a set of fine needles on a handle—breaks up clumps in your ground coffee before tamping. Clumps cause channeling, which means uneven extraction and inconsistent results no matter how well you've dialed in your other variables.
What to look for: 0.3-0.4mm needle thickness, 5-8 needles, comfortable handle. You can also make one from a cork and acupuncture needles.
Calibrated Tamper
Why it matters: A calibrated (spring-loaded) tamper applies the same pressure every time, removing one variable from your process. Consistent tamping means your grind adjustments show clearer results.
What to look for: Match the diameter to your portafilter basket (most commonly 58mm). Calibrated tampers click at approximately 15kg of force.
The Four Variables That Control Your Shot
Every espresso shot comes down to four adjustable variables. Understanding what each one does—and which to change first—is the core of dialing in.
1. Dose (Input Weight)
The dose is the weight of dry ground coffee you put into your portafilter basket, measured in grams. Most standard double baskets work best with 17-19g. Your specific basket will have a recommended dose range—start in the middle.
Rule of thumb: Set your dose and leave it. Dose is typically the variable you change least during dialing in. Pick 18g as a starting point for a standard 58mm basket.
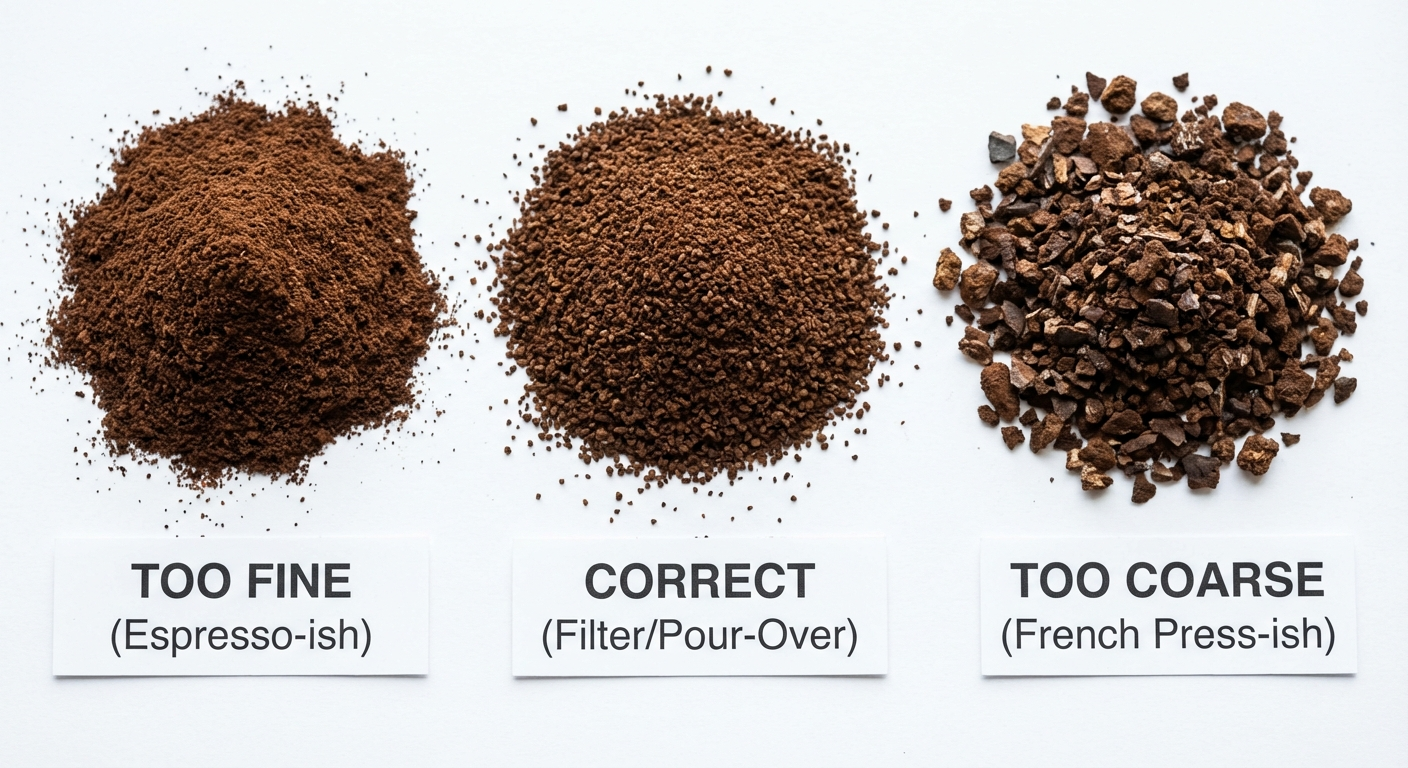
2. Grind Size
Grind size is your primary adjustment tool. Finer grinds create more resistance, slowing the water and increasing extraction. Coarser grinds let water flow faster, decreasing extraction.
This is the variable you'll adjust most during dialing in. Small changes matter enormously—a single notch on many grinders changes shot time by 3-5 seconds.
3. Yield (Output Weight)
Yield is the weight of liquid espresso in your cup, measured in grams. Combined with dose, this gives you your brew ratio. A 1:2 ratio (18g in, 36g out) is the standard starting point for most espresso.
- 1:1 to 1:1.5 — Ristretto: intense, concentrated, heavy body
- 1:2 — Standard espresso: balanced sweetness and clarity
- 1:2.5 to 1:3 — Lungo: lighter body, more clarity, risk of bitterness
4. Time
Time is the result of your other variables, not something you set directly. With your dose, grind, and yield dialed in, the time tells you whether extraction was appropriate.
Target range: 25-35 seconds for most coffees at a 1:2 ratio. But time is a diagnostic tool, not a goal. A shot that runs 38 seconds but tastes balanced is better than a shot forced into 30 seconds that tastes sour.
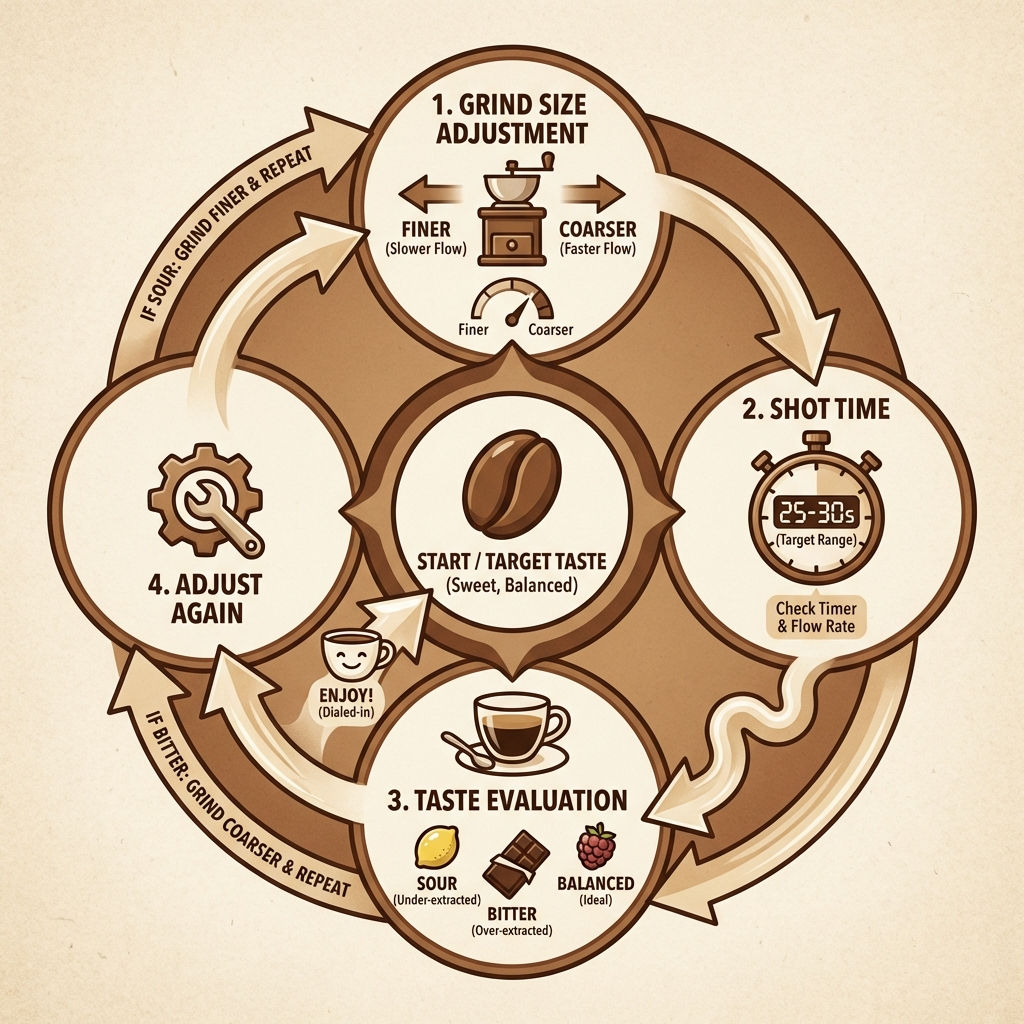
Step-by-Step: How to Dial In Espresso
Here's the exact process. Follow it in order, change one variable at a time, and take notes on every shot.
Step 1: Set Your Dose
Weigh 18g of fresh coffee beans (adjust if your basket specifies a different range). Grind them into your portafilter. This dose stays fixed throughout your dialing-in process unless you have a specific reason to change it.
Step 2: Start with a Medium-Fine Grind
If you're using a new grinder or new beans, set your grinder to a medium-fine espresso setting. Don't overthink the starting point—you're going to adjust it. The first shot is diagnostic, not drinkable.
Step 3: Prepare Your Puck
Distribute the grounds evenly in the basket using a WDT tool. Tap the portafilter gently on the counter to settle, then tamp with firm, level pressure. Consistent puck preparation is critical—if your puck has channels or uneven density, your grind adjustments won't show clean results.
Step 4: Pull Your First Shot
Lock in the portafilter, place your cup on the scale, tare it, and start your shot. Simultaneously start your timer (or use your scale's built-in timer).
Stop the shot when you reach your target yield—36g for an 18g dose (1:2 ratio).
Record: dose, grind setting, yield, time.
Step 5: Evaluate and Adjust
Now taste the shot and note the time:
If the shot ran fast (under 20 seconds) and tastes sour/watery: → Grind finer. The water passed through too quickly, under-extracting the coffee.
If the shot ran slow (over 40 seconds) and tastes bitter/ashy: → Grind coarser. The water was restricted too much, over-extracting the coffee.
If the shot ran 25-35 seconds but tastes slightly sour: → Grind one small step finer, or increase yield slightly (try 38g instead of 36g).
If the shot ran 25-35 seconds but tastes slightly bitter: → Grind one small step coarser, or decrease yield slightly (try 34g instead of 36g).
Step 6: Repeat with One Change
Make one adjustment only, pull another shot, and taste again. Compare it to your notes from the previous shot. Getting closer to balanced? Make a smaller adjustment in the same direction. Overcorrected? Step back half the distance.
Step 7: Lock It In
When a shot tastes balanced—sweet, with pleasant acidity and no harsh bitterness—record everything. This is your dialed-in recipe. Pull one more shot to confirm it's repeatable.
How to Read Your Shot: Taste Troubleshooting
Your tongue is the best diagnostic tool you have. Here's how to translate what you taste into what to adjust.
Sour, Acidic, Sharp (Under-Extracted)
The water didn't dissolve enough of the coffee's soluble compounds. Sour notes come through first during extraction, so a short or fast extraction leaves them dominant.
Fixes (try in order):
- Grind finer
- Increase yield (e.g., 36g → 40g)
- Increase brew temperature (if your machine allows it)
- Check that beans aren't too fresh (under 7 days off roast)
Bitter, Ashy, Harsh (Over-Extracted)
The water dissolved too much, pulling out unpleasant bitter compounds that extract late in the process.
Fixes (try in order):
- Grind coarser
- Decrease yield (e.g., 36g → 33g)
- Decrease brew temperature
- Check that beans aren't stale (over 5-6 weeks for espresso)
Balanced but Weak or Thin
The extraction percentage might be right, but the concentration is too low.
Fixes:
- Increase dose slightly (18g → 19g) and adjust grind to maintain time
- Decrease yield for a more concentrated shot (try 1:1.8 ratio)
Balanced but Overwhelming, Intense
The opposite problem—too concentrated.
Fixes:
- Increase yield (try 1:2.2 or 1:2.5 ratio)
- Decrease dose slightly and adjust grind
If you're new to tasting espresso, don't worry about identifying specific flavour notes yet. Focus on the simple question: Is it sour, bitter, or balanced? That's enough to guide your adjustments.
Puck Preparation: The Secret to Consistency
You can have perfect variables on paper—18g in, 36g out, 28 seconds—and still get a bad shot if your puck preparation is uneven. Channeling (water finding paths of least resistance through the puck) causes localised over- and under-extraction simultaneously, producing a shot that's somehow both sour and bitter.
The Puck Prep Routine
-
Grind into a dosing cup (not directly into the portafilter). This lets you see and break up clumps before they reach the basket.
-
Transfer to the portafilter and use a WDT tool. Insert the needles to the bottom of the basket and stir in a circular pattern, working from the outside in. Spend 5-10 seconds on this.
-
Tap and settle. Give the portafilter 2-3 light taps on the counter to collapse any air pockets.
-
Level the surface. Use a distribution tool or your finger to create a flat, even surface before tamping.
-
Tamp firmly and level. Press straight down with about 15kg of force (a calibrated tamper handles this for you). The surface should be flat and polished.
-
Clean the rim. Wipe any stray grounds from the portafilter rim and lugs. Grounds caught in the group head gasket cause poor sealing and uneven extraction.
This routine adds about 20 seconds to your workflow and eliminates the most common source of inconsistent shots. If you're getting wildly different results from shot to shot despite not changing your grind, puck preparation is almost certainly the issue.
Common Dialing-In Mistakes Beginners Make
After teaching dozens of home baristas, these are the errors that come up most:
Changing Multiple Variables at Once
This is the number one mistake. If you grind finer and change your dose and adjust the yield, you have no idea which change affected the result. Change one thing. Pull a shot. Taste. Then decide on the next adjustment.
Chasing Time Instead of Taste
A 27-second shot is not automatically better than a 33-second shot. Time is a diagnostic indicator, not a target. If your shot tastes great at 34 seconds, leave it there. The "25-30 seconds" guideline is a starting reference, not a rule.
Not Purging the Grinder
When you adjust your grind setting, old grounds at the previous setting are still sitting in the burr chamber. Purge 1-2g of coffee through the grinder after each adjustment. Otherwise your "finer" shot contains a mix of old-setting and new-setting grounds.
Using Stale or Pre-Ground Coffee
Pre-ground coffee begins losing volatile aromatics within minutes of grinding. You cannot meaningfully dial in with pre-ground coffee—the variables shift on their own as the grounds oxidise and degas. Whole bean, ground fresh for each shot, is non-negotiable for espresso.
Ignoring Temperature Stability
Many entry-level machines need a warm-up period of 15-25 minutes before the brew temperature stabilises. If you start pulling shots on a cold machine, your first few results will be misleading. Run a blank shot (water only) before your first dose to flush cold water from the group head.
For more on choosing the right machine for consistent results, check out our guide to the best espresso machines for home baristas.
When to Re-Dial Your Espresso
Dialing in isn't a one-time event. Coffee is an agricultural product that changes constantly. Here's when you need to re-dial:
New bag of beans: Always. Even the same coffee from the same roaster will differ batch to batch. Start with your last recipe and adjust from there—you'll usually be close.
Beans aging: Coffee becomes more soluble as it degasses over days and weeks. Most home baristas find they need to grind slightly coarser every 3-5 days to maintain the same extraction.
Weather changes: Significant shifts in humidity and temperature affect both your beans (they absorb moisture from the air) and your grinder's behaviour. Seasonal changes often require re-dialing.
Machine maintenance: After descaling, backflushing, or replacing a shower screen, your flow dynamics may shift slightly. Pull a test shot before your morning coffee.
Switching between coffees: If you alternate between two bags, keep notes on both recipes. Some grinders hold their setting well; others drift and need a quick re-dial when switching.
Dialing In for Milk Drinks vs. Straight Espresso
If you primarily make lattes, cappuccinos, or flat whites, your dialing-in approach shifts slightly.
Milk masks subtlety. A shot that tastes beautifully nuanced on its own may get lost in 200ml of steamed milk. For milk drinks, many baristas deliberately dial for a slightly more intense, higher-extraction shot:
- Slightly finer grind or slightly higher dose (19g instead of 18g)
- Tighter ratio (1:1.8 instead of 1:2) for more concentration
- Medium-dark roasts often pair better with milk than light roasts
Taste your espresso in milk to evaluate. A shot that's slightly too bitter on its own might be perfectly balanced once it's cut with milk. Dial in for how you'll actually drink it.
For tips on steaming milk to complement your perfectly dialed shot, see our milk frothing guide for beginners.
And if your espresso station is getting cluttered with all this new gear, the team at Home Organization Guide has excellent ideas for keeping kitchen countertops tidy and functional.

Frequently Asked Questions
What does it mean to dial in espresso? Dialing in espresso means adjusting your grind size, dose, yield, and extraction time to produce a balanced, flavourful shot. It's the process of fine-tuning variables until your espresso tastes neither sour (under-extracted) nor bitter (over-extracted), but sweet and complex.
How long should it take to dial in espresso? For a new bag of beans, expect to use 3-6 shots to dial in. Experienced home baristas can often get close in 2-3 shots. When switching to a completely different roast level or origin, it may take more attempts. Each adjustment should change only one variable at a time.
Why does my espresso taste sour even after adjusting grind size? Sour espresso indicates under-extraction. If grinding finer hasn't helped, check your dose (try increasing by 0.5g), water temperature (aim for 90-96°C), and whether your beans are too fresh (wait 7-14 days off roast for espresso). Also verify your puck preparation is even—channeling causes localised under-extraction.
Do I need a scale to dial in espresso? Yes, a scale accurate to 0.1g is essential for dialing in espresso consistently. Without one, you're guessing at both your input dose and output yield, which makes it nearly impossible to replicate good results or systematically troubleshoot bad ones. A basic coffee scale costs under $30 and is the single best investment for espresso quality.
How often do I need to re-dial espresso? You should re-dial your espresso every time you open a new bag of beans, switch to a different coffee, or notice a significant change in ambient humidity or temperature. Even the same beans age over time—most home baristas make small grind adjustments every few days as beans degas and become more soluble.
What is the best espresso ratio for beginners? A 1:2 ratio is the best starting point for beginners. This means if you dose 18g of ground coffee, you aim for 36g of liquid espresso in the cup. This ratio produces a balanced shot that works well with most medium roasts. From there, you can adjust shorter (1:1.5 for ristretto) or longer (1:2.5) based on taste.
Sources and Methodology
This guide draws on established espresso science and widely accepted barista methodology:
- Brew ratio and extraction principles are based on the Specialty Coffee Association (SCA) standards for espresso, which define optimal extraction yield as 18-22% of soluble coffee mass.
- The 1:2 ratio starting point is the industry-standard recommendation used by professional barista training programmes worldwide, including those accredited by the SCA and the Barista Guild.
- Temperature guidelines (90-96°C) align with SCA brewing standards and research published in the Journal of Agricultural and Food Chemistry on coffee extraction kinetics.
- Bean freshness windows (7-21 days) reflect the consensus among specialty roasters and are supported by degassing research indicating that CO₂ release stabilises approximately one week post-roast.
- Puck preparation techniques (WDT, distribution, calibrated tamping) are based on methods popularised by espresso researchers and competition baristas, and validated through community testing and barista championship routines.
- Taste-based troubleshooting framework (sour = under-extracted, bitter = over-extracted) is grounded in coffee chemistry: lighter, more acidic compounds extract first, while heavier, bitter compounds extract later in the process.
All product recommendations reflect categories of equipment rather than specific paid endorsements. Affiliate links help support Home Coffee Spot at no additional cost to readers.
Looking for more espresso fundamentals? Browse our full espresso guides collection for everything from machine reviews to latte art tutorials.